
For some reason I just love this napkin! And I wanted to share…a little Tuesday Tip at the end of an especially challenging day. Enjoy!
Tuesday Tip
Wednesday Food Tip: Berries on the Edge!
in Tuesday Tip

It never fails! I always pick up a few cartons of berries at the store when I shop. Once home I clean them up with visions of eating them in so many different ways.
Inevitably and as hard as I might I never go for a fresh bowl of berries. Nor do I whip up something luscious with them. Instead, I’ll opt out and go for something like ice-cream or a piece of chocolate. Well, when given the choice anyway.
Therefore, what happens? Those beautiful berries get pushed back into the fridge and are lost for a while. Once I remember they’re there they look pretty sad. But still usable in some form.
So here’s what I do. I cut off the stems and all yucky parts. Get rid of the moldy berries and those that surround them. Slice and put them in a small non-reactive sauce pan. Then cook them for 1-hour. And I get a nice little fruit “sauce” to put on my ice-cream. Not bad, huh? Below are pictures I took of the cooking process so you know how the sauce should look.
By the way, any leftover berry will do. Here I used straws and blues. And always cook the berries over low heat; so as not to burn them.
The beginning, at 20 minutes and at 1-hour consecutively.


Tuesday Tip: How to Dry Herbs Gently
in Tuesday Tip
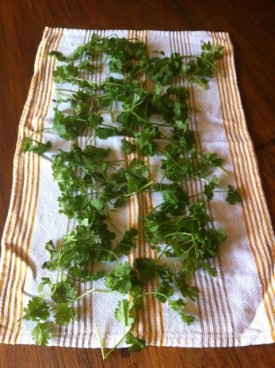
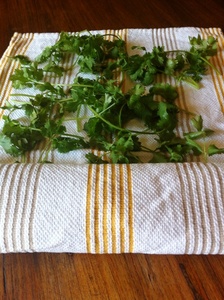
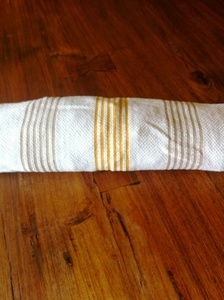
It’s really no big secret! Drying herbs, no matter if they are fine (like cilantro) or hard (like rosemary), is extraordinary simple. Once washed just scattter them about on clean toweling. Roll from the bottom up gently until you’ve reached the top. Do not roll too tightly leaving breathing room for the herbs. Set aside on the counter or in the fridge for about 15 minutes. Unroll and use. Just a quick Tuesday Tip for you and yours!
Tuesday Tip: Make Some Beach Waffles — With Your Shirt Off

Wow…we’re finally here. The beach with our good friends the Ozor’s. It’s our first morning and there’s been quite a bit of conversation about this week’s Tuesday Tip.
There’s a new gadget in the kitchen this summer. It’s a waffle maker. So, it was decided by Gracie (who loves to cook and is my #1 blog fan) we should have some sort of Tuesday Tip around yummy waffles. Dad, Tim, is the official waffle maker of the family. After a long island run with my hubby, Mike, he was in the kitchen gathering waffle making ingredients for our first beach morning breakfast.
Since this isn’t a recipe blog post (that’s for Friday’s Food Find) I’m going to just say find your favorite base recipe to make a waffle batter. Here’s one from King Arthur Flour for a whole wheat waffle batter.
Tim likes to use a combination of whole wheat and white flour in his own waffle recipe. Here are several tips that Tim works by when making batter and cooking cooking his waffles.

1. Mix waffle batter thoroughly.

2. Use a 1/4C measure for pouring batter into waffle iron.

3. Cook until golden.

4. And always cook with your shirt off.
For a Tuesday on our summer beach vacay with favorite friends and my #1 blog fan, I think 4 tips for making some fab breakfast waffles can’t be beat! Now it’s time to go to the beach. See you on Friday.
Tuesday Tip: A Wondrous Photo App

When I first began this blog I decided that for this medium I wanted my pictures to look natural and in their true form; without a whole lot of juj and bedazzle. This is espcially true for my pictures of food. Naturally I was curious about what type of camera I should purchase to take the best pictures. Then I got an iPhone 3G. Wow! Does it take a good picture. In fact most of all the pictures I’ve taken on this blog have been with my iPhone. And I haven’t felt too limited by it. Maybe this is inexperience but so far so good. That said, I did want to learn about new ways to shoot and edit with my phone. So, I took a photography class especially for the iPhone.
And this is what I learned. There are a tons of iPhone apps you can purchase to help you shoot, edit and use special effect for that perfect picture. We studied 10.
Since class I’ve been playing around with them and quickly have realized that there are a few that I’ll use all the time. The one that I’m absolutey hooked on is Pro HDR. Your pictures come out with phenom resolution. Shooting towards light and getting the backlit dark/light constrast will be a thing of the past. You only need to touch the screen to take your picture. And you have the ability to edit and add effects. You do have to be still when it’s analyzing and taking both pictures (you’ll see how it works). But you’ll get the hang of it quickly.
The picture above is the first I took in class. I moved when the 2nd picture was processing. Therefore, there’s a blurred effect. Then I added the word look.


Above is exactly how the app works. It takes 2 pictures - one back and one forward, analyzes, processes each and then combines.
It’s a wondrous app and one I recommend for this week’s Tuesday Tip.