Tuesday Tip

Tuesday Tip: A Vinaigrette Container

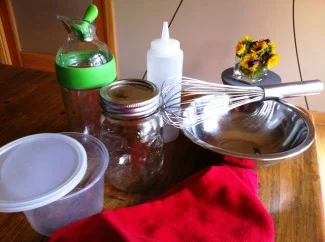
It’s easy! Just take your pick…of any one of these containters.  From which will come a most fabulous vinaigrette.  It’s really just about the tool.

To make a simple vinaigrette you must emulsify two unlike ingredients an acid (liquid) & a fat (liquid).  To do this isn’t such a trick as you might think.  The traditional way, which all chefs learn, is to use a bowl and whisk.  That takes some elbow “grease”. For a gadget person the best tool would be to use an salad dressing shaker. The design alone is super hip.  Another would be to mix up a mess of the vinaigrette in a squirt bottle.  Oh yeah! Just a little squirt here and there.  A yesteryear tool your grandma or mom may have used is the mason jar.  Which makes you the new glass fashionista vinaigrette mixologist! 

Sure I’ll use any of these - and have.  Obviously, I have them all.  But my ultimate favorite emulsifying tool for a vinaigrette is 2-Cup plasticware container.  I know your eyeing it over there in the picture.  And you may just be saying to yourself, “Really? Huh?”  It’s true! I can’t help myself.  Here’s why.  It’s full-service.  You make your vinaigrette in the container, snap the lid, shake, shake, shake vigorously over the sink, gently pour (as much as you need) out of the container onto your salad, snap the lid back on and pop it in the fridge to store for later.  It’s also a space saver in the fridge as it is small and stackable.

So there you have it.  Perhaps a little surprising but this chef’s favorite emulsifying tool for a vinaigrette is a little plastic container.  A tool, and I’m just speculating here, that’s already right there in your “tupperware” drawer or cupboard.  Am I right?  And there’s the Tuesday Tip.

Tuesday Tip: A Knife and Cutting Board

Safety in the kitchen is so important.  We all know this but sometimes it’s the little things that may cause catastrophe; especially with a knife.  One of the first rules a budding chef learns in school is how to use a knife. Also that the knife is an extension of our primary kitchen tool, the hand. Therefore, it should be respected and handled with reverence. 

How to place a knife when stepping away from a cutting board is a very important part of knife safety. Why? If a knife is placed in a precarious position on a cutting board let’s say blade facing inward. Inadvertently the hand or finger may brush against the blade while trying to pick something up or move something on the cutting board. Very fast and simply that brush agaist the knife could cut the skin wide open. Particularly if this is a super duper sharp blade.  It’s just not worth it.  

So, the cut-saving, safer and more organized way to place a knife on a cutting board while working is placing it blade side out. Or in other words positioning the  knife so that the blade is turned away from you. 

And that’s my Tuesday Tip!

Tuesday Tip (Just Throw It in the Pool): Defrosting Meat

What’s that floating around in the pool at Casa de la Pav?  It’s a short story that needs to be told.  And the end is a fabulous tip which is a solution to defrosting meat fast!

A few summers back, I was bemoaning the fact that once again I “had” to start dinner after 7pm on a weeknight.  By the way, my husband, Mike, is a pretty good cook too and he doesn’t mind cooking but I have a little guilt about that. That’s another story.  Anyway, there are any number of reasons for why we eat later, Mike’s work schedule, the evening Jazzercise classes I teach, poor planning etc, etc etc….  Mike and I may chat during the day about dinner but we’re not apt to make a decision. Sound familiar? Some may say just go out.  However, it’s important to us to eat healthful and delicious meals.  But trying to do this after we get home from our daily endeavors really sucks! For me the real challenge is getting to the point of actual cooking; getting through the prep.  And a big part of this is defrosting anything especially meat.  Obviously, because of our inadequate planning, we haven’t taken meat out of the freezer the night before or morning of to defrost; either in the fridge or on the counter  (like my mom taught me). Last minute I really dislike putting it into the microwave since it never comes out without edge browning, an uneven thawing or some such thing.  It’s a dissatisfying cunundrum for me.

So on this particular night the bemoaning turned into hissing and bitching (I know, hard to believe) about defrosting the meat.  I guess my dear husband had had his fill (imagine that) when I heard him say, “Just throw it in the pool!” “What?” I responded. “Just throw the damn meat in the pool!” he exclaimed.  “Noooooooo! That’s unsanitary, it’s gross, how’s that going to work?” I loudly mumbled.  He just looked at me, took the meat, walked out the door down to edge of the pool and threw it in.  I was aghast! I’m a professional. I knew better.  I mean I didn’t pay for the privledge these last 14 years for my food handler & kitchen permitting for nothing.  I recieved a glowing health inspection every year.  What’s this throw the meat in the pool technique?  I can tell you that it’s not on the list of approved defrosting methods by the health department not to mention the approved by mom method! 

But guess what?  It worked.  Not only did it work but the meat defrosted quickly and evenly; in half the time of the microwave.  I’m a believer. Thank you my patient, practical and sweet husband Mike.

While I’m a believer I’m not neccessarily going to promote this technique; just write about it.  It’s not for everyone and certainly not for a professional.  However, if you have some curiosity and need quick meat defrost fix - IT WORKS! 

Now, if you’ll excuse me I need to go find some frozen meat so I can “just throw it in the pool”!

Tuesday Tip: Use a Colander for Blanching Vegetables

One of the best ways to cook vegetables is by blanching them; and using a colander.  

Simply put, blanching is the technique of cooking your vegetables in super hot salted water. Then placing them in an icy cold water bath to stop the cooking process.  The objective is to have a perfectly cooked “crisp & tender” texture.

An iced water bath is all well and good.  However, if you dump your vegetable from the hot into iced water it will mix. Inevitably chunks of ice will come out along with your perfectly cooked vegetable.

To prevent this add a colander to your bowl of iced water.  The colander must be submerged.  You’ll want to find one that fits into the bowl you are using for your iced water.  

Use the same motion of adding the cooked vegetable from the hot water to your iced water, only put the vegetable inside the well of the submerged colander.  Swish your vegetable around to cool.  Lift the colander out of the water, shake gently to remove excess water and place vegetable on toweling to pat dry.

Now you have your vegetable ready to go; and without excess ice melting away.  

That’s your Tuesday Tip; a colander just rocks!

Tuesday Tip: The Art of Layering

Only the middle of August but we are at Summer’s end.  Here is a pictoral commemoration of a fantastic tomato and basil season here in ATX.  Along with some thought on layering.

I love detail.  So, when I began making dishes for my business that was something extraordinarily important to me.  To combine ingredients with different shapes, color and texture is a form of art for me.  And to have cool ingredients like tomato and basil is super wondrous. 

When layering for a salad such as the one you see here are a few things to consider.  Always think about having like sized tomatoes.  Slice each the same width and length.  Use these same tips when buying and slicing your mozzarella. Pinch basil leaves so that they stand up to the size of the tomato and mozzarella.  Begin layering in this order: tomato, mozzarella, basil and repeat.  Keep all ingredients consistantly going in the same direction.  I call this pointing every “soldier” in the same direction.

I’ve had some friends and students say, “Beth isn’t that a little compulsive?”   And I say, “Absolutely not! It’s just a simple art form.”  And for today, it’s Tuesday’s Tip(s) on layering with Summer’s last tomatoes and basil.