Lunch by Design

Memorial Day: Grilled Rosemary Flank Steak

It’s Memorial Day weekend; and in my mind the official start of the Summer.

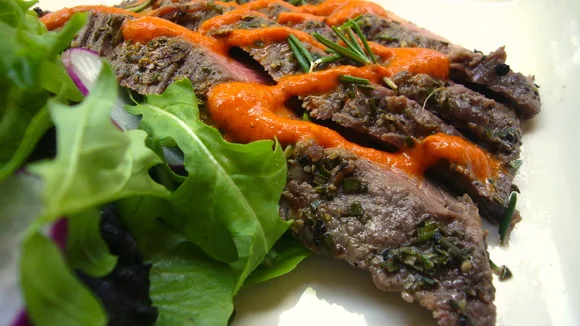
I’ve been preparing steak for many years and this by far is one of my favorite flavor combinations.  It’s simply rosemary, salt and pepper.  

The best technique  to a well cooked steak is to LEAVE IT ALONE.  While there may be many a dissenter on that single point, I’m a firm believer in it.  And it was one of the first lessons I learned about grilling in my early years working in restaurants.  

The best tip is to always season your steak right before you cook it; particularly exceptional cuts like tenderloin.  In this case I’m using flank which originally was lower on the beef food chain until fajitas became so popular.  I really like it for this recipe.  However, you can apply it to any cut you like.  

I’ve also added a little roasted red pepper sauce.  It is a great accompaniment with this steak; and, oh, so simple to make.

So, if you are looking for a simple, quick and delicious steak recipe for your Memorial Day - go no further than a stove top rosemary grilled flank steak.  Enjoy!

For the steak

Ingredients

1/3 C fresh minced rosemary
1/4 C of kosher salt
1Tbls cracked black pepper
1 - 1 1/2lb  size flank steak

Process 

Mix first 3 ingredients in a bowl. Generously sprinkle then rub this mixture on all sides of the steak - right before you are going to cook it.  For medium-rare: Place seasoned steak in the heated grill pan over high heat. After 3 minutes turn the heat down to medium. Cook for up to 2 more minutes.  Turn steak over to the other side and repeat the process.  (To check for doneness take one steak off grill slice down the center but not all the way through.)  When the steak is done pull it from the grill pan, set it on a cutting board and let rest for up to 10 minutes.  Slice thinly against the grain.  Serve with Roasted Red Pepper sauce.

Yields 4 6oz servings.

This technique can be used for a charcoal or propane grill as well.  If you use direct flame heat, a good addition to the process is adding some rosemary wood or stalks to add a little extra herbal smoke.


Roasted Pepper Sauce

Ingredients

4 red bell peppers, roasted & seeded
Salt & Pepper to taste

Process

Place peppers into a blender.  Blend until ingredients are incorporated.  When blended thoroughly, pour into a sieve and strain into a bowl.  Place pureed pepper back into blender and add 1/8C of extra virgin olive oil. Blend to incorporate so that mixture is smooth.  Add salt and pepper to taste.  Serve with flank steak.

How to roast a pepper:

Over Flame: 

Rub whole pepper with olive oil.  Place over flame on stove eye.  Turn with tongs as each side, top & bottom becomes charred.  

In Oven:

Slice pepper in half.  Rub outside with olive oil.  Place on sheet pan cut sides down. Pop into oven under the broiler until skin is charred.  
Once peppers are charred, remove from prospective heat and place in a bowl.  Cover bowl with plastic wrap and let sit for up to 30 minutes.  Remove plastic wrap, remove charred skin from peppers along with seeds and stem.

A Valentine Oyster — An aphrodisiac or just delicious?

The most memorable words my culinary chef/instructor said to me was the evening we were introduced to shellfish; oysters to be exact.  

With a shucked oyster in his hand, he said, “Beth this is nectar of the Gods.” He then brought the shell up to his lips, tilted his head back, sucked in and slurped it right down. Finished he looked me straight in the eye and said,

“It’s better than sex!”

I grew up in Fort Worth, Texas; which is North Central.  You could only get oysters at a little place called J&J Oyster Bar. They served Gulf oysters (Texas Gulf) and my Dad loved eating them; and still does.  I on the other hand watched my dad slurp those bad boys down thinking, gross! How can he eat those slimy, sandy and musky smelling globules?  I couldn’t stomach it.  Plus, there was always a lot of condiment action involved with eating the oysters; hot sauce, tarter sauce, horseradish and lemon. Seemed to me they were just a vehicle for the extras.  That was my first introduction to the oyster.

So you could imagine my trepidation when I walked into my culinary class and oysters were on the menu.  Even though Chef Pascal professed his undying love, I still didn’t try one; not in class anyway.

I finally had the courage to try an oyster in my first line cook job.  We would occasionally have oysters on the menu.  Since we were encouraged to try everything it was pretty much a given that I would have to suck it up and eat one.  Well, the Executive Chef was very kind to me.  She really gave me a lesson on the differences between cold and warm water shellfish; such as the level of brininess, size and texture.  

To this day I will never forget the first time I tried an oyster while working at the restaurant. It came from the Atlantic Ocean. It was called a Moonstone; icy, sweet, briny and a little magical.  I’ve tried many oysters since; mostly from cold waters (I just think they have a better flavor).  Never do I have anything but a little mignonette splashed on my oyster - if that.  

So, I’m not going to say if an oyster is better than sex or not.  I will say that eating the right oyster, at the right time and with the right condiment (or not) lends itself to something quite remarkable - if not just delicious! Here’s your recipe. 

Ingredients

1/4C of shallot, peeled & minced
1/2C seasoned Rice Vinegar
2tsp of fresh coarsely ground black pepper
6 shucked oysters - half-shell
Crushed ice

Process

Several hours before serving oysters, combine shallot, vinegar and pepper in a container with a lid.  Tightly seal, shake vigorously and place in the refrigerator to store until ready to use.

Pour crushed ice into a 2” deep dish spreading around so that the ice comes up right below the top of the rim.  Take the oysters on the half-shell and arrange them decoratively around the outer edge of the dish.  

Take mignonette (vinegar mixture) out of the fridge and pour into a small ramekin.  Place ramekin in the center of the pan with a small spoon.  Serve.

Tips & Techniques

To store whole oysters buy fresh as possible, place in a stainless steel container and put them into your fridge.
Many fish markets will shuck the oysters for you.  Although it may be a few extra dollars it’s worth it.  If you are not familiar with shucking an oyster it’s the safest and simplest way to go. I recommend it.
Mignonette is a traditional French sauce used on oysters to compliment the brininess of the oyster.  
For a comprehensive introduction to types of oysters check out Rowan Jacobsen’s blog The Oyster Guide 

Friday Food Find: Goat & Cream Cheese Pate

I first saw this recipe in Gourmet Magazine years ago.  Always looking for fabulous party dishes for my catering company this one caught my eye immediately.  It’s visually inviting, tastes heavenly (especially if you like goat cheese) and it’s perfect to have or bring to a party.  I generally serve it with garlic toasts or multi-colored vegetable chips.  Really you can use anything that you find pleasing.  It’s gone through a lot of tweeks since I first made the recipe from the magazine.  And by trial an error I learned a few things which you will see below under “Tips”.  Have fun and enjoy!

Ingredients

4 - 8 ounce packages of cream cheese
1.5 C of goat cheese
¼ to ½ C of whipping cream
1-2 Tbls of fresh lemon juice
Salt and pepper
1-2 small containers of sun dried tomatoes in oil, drained and patted between paper towels
½ to 1 C of pesto
Fresh herbs or flowers to garnish

Process

Line the inside your favorite ceramic or pyrex dish with plastic wrap (7"x10” rectangle or a square works great). Make sure that the plastic wrap is very smooth on the insides & pressed smoothly up and around every edge. Leave enough plastic so that it hangs over each side and over the edge of your dish.  Set aside.

In a food processor process cream cheese, goat cheese until smooth.  Drizzle in whipping cream to open up the cheese mixture. Which will make it smoother and more airy.  Drizzle in up to ½ C although you may not need it. Add one TBLS of lemon juice at a time for flavor only.  You may not need the second one.  Stop machine at intervals to scrape down the sides with a spatula.  Mix in salt and pepper to taste.  Place cheese mixture in to a pastry bag with a large round tip.  

Place your plastic lined dish in front of you, very gently pipe in your cheese mixture with your pastry bag so that you have one even layer on the bottom of your dish. I generally begin piping from the outer edge of the bowl.  And then move inwards towards the center following the line of the dish you are using.  On top of your 1st cheese layer gently finger or spoon in the sun dried tomatoes so that they are spread evenly over the cheese layer. Then pipe another layer of cheese mixture over tomatoes.  Repeat this process with the pesto.  Then pipe one more layer of cheese over the pesto. This will be your last layer.  Smooth each cheese layer out with a small off-set spatula and cover tightly with the overlapping plastic.  Place in refrigerator overnight.

The next day take pate out of refrigerator and peel plastic from the top.  Place a serving platter (large enough to cover the pate dish) over the ceramic dish and gently invert.  Gently pull the ceramic dish from the pate and set aside.  Very carefully pull the plastic wrap from the pate.  Smooth pate with a spatula.  Garnish with herbs and flowers.  Serve with parmesan toasts.

Tips
*The smaller & deeper your dish the more layers you may have or excess ingredients.   
*Always drain the oil from the sun-dried tomatoes & pesto prior to using in this pate.  Excess oil will seep out of the final pate if there is too much.
*Use the added liquid (cream, lemon juice) sparingly.  You only want the cheese mixture to be “spreadable” not too soft.  If it is too soft add more cream cheese.  It will spread somewhat once unmolded if too soft.