Sides by Design

The Best Panettone in the World

No! I do not like bread that is naturally sweet or bread with candied anything, nuts or fruit. There, I said the blasphemous no word torward a beloved holiday food like, well, panettone. 

For those who don’t know what panettone is I’ll give you a little information.  It’s a traditional Italian sweet bread that originated in Milan.  It’s made with any number of candied fruit, citron, raisins and citrus zest; namely lemon or orange.  It’s tall, light and in some instances extremely fluffy.  What’s not to like?  

And that’s where Williams-Sonoma comes into my story. 

Now I’m not one to overly exclaim how much I like a certain space, but I really do love Williams-Sonoma (and don’t forget the s at the end of Williams).  I’ve had a lot of firsts there like; teaching a cooking class, buying my first box of Maldon salt and most importantly having my very first taste of a sweet bread called panettone.

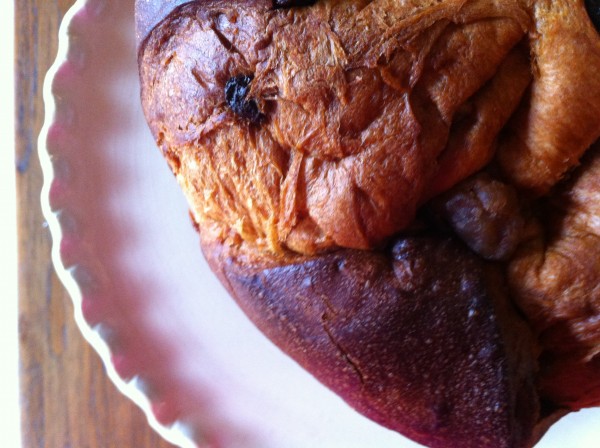
This is your first look at the best panettone in the world! 

img_7594_580.jpg

I must have been going through a weird, I want to try everything chestnut stage, during holiday shopping one year.  I stepped into the store and they had samples out for a taste.  And I did just that.  OMG!  I went back for more. Then bought not one but two cannisters of this delectible sweet bread.  Then I walked out of the store and told everyone I knew about it. 

Now, it’s my go-to holiday party, house, family and just because gift. 

According to the labeling on the cannister that carries the panettone it is made by, Pasticceria Scarpato.  However, don’t go tryin’ to “get it a little cheaper” by going to the source (Ok, true confession: I’ve tried.) Because you won’t find it easily accessible as it’s made exclusively for Williams-Sonama.  

Here’s my advice: buy it ON-LINE.  Or if you really love the holiday mall shopping experience, RUN to a retail store. Don’t dwadle because they do sell-out.

Like I said, I’ve always been a no person to a sweet bread.  Let’s just say that this panettone has given me a new perspective on the tradition of a holiday sweet bread.

The scent is what first hits you when you open the red cannister; lightly toasted caramel.  The bread is soft and feathery with copious amounts of glazed chestnuts sprinkled throughout.  It’s THE delectible holiday treat.  And why I think it’s the best panettone in the world.  

Thank you Williams-Sonoma.

img_7580_580.jpg

Tuesday Tip: How to Roast a Butternut Squash & Brussel Sprouts

Happy Thanksgiving week!  I’m giving thanks for a wonderful life, a great husband, a close and kind family (which I get to visit with this holiday), my sweet dog Jacques & my friendships. 

I thought I’d bring you a recipe for your Tuesday Tip.  I love roasted vegetables during the Fall and Winter.  They just scream cool crisp days and chilled winter evenings. 

But really the best thing about a roasted vegetable is that you can make it ahead of time for your holiday dinners.  In fact, I’ve been known to make several different types of roasted vegetables the night before, store in the fridge, then bring them to room temperature and serve.  How’s them apples? 

The second best thing about serving a roasted vegetable is that you can serve it at room temperature.  It’s a fail safe on both “best things”; not too mention time saving.  Oh, yeah! 

Ingredients

1 medium butternut squash, peeled, seeded & cut into 1” pieces
3C brussel sprouts, stem trimmed, large brussels cut in half
1C extra virgin olive oil
1Tbsp salt
3tsp fresh ground pepper

Process

Pre-heat oven 350°

Place butternut squash on one sheet pan.  Place brussel sprouts on another sheet pan. Gently drizzle half of the olive oil over butternut squash and half of the seasoning (salt & pepper). Repeat  process for brussel sprouts.  Mix thoroughly so that all vegetable pieces are surrounded by olive oil and seasoning. Take both sheet pans and place them in the oven on the top and center shelves.  Roast for up to 40 minutes (checking doneness at 10 minute intervals) or until you are able to stick a skewer through the vegetables; they should be soft all the way through.  Serve immediately.  Or store in a tightly lidded container in the fridge. 

Yields up to 12 side servings.

Note:  You can store vegetables up to 4 days in the fridge. This recipe’s technique can be used for most vegetables.

Friday Food Find: Cranberry Sauce

It’s the Holiday’s…with a capital H!  OMG! In just a little over a week some of us are going to be sitting down to a table full of turkey and fixin’s.  It has only been as an adult have I come to like, enjoy and even crave one this holiday’s most precious accouterments: cranberry sauce.  Oh, the beet colored, jelly shaking, tin can indented blob of what some may call cranberry sauce still exists.  In fact it’s what I grew up with and most probably why I didn’t appreciate how wonderful it could really be.  You know, I’m not judging, I’m just saying, “There’s another way; and, it takes 3 ingredients (1 optional) and no cooking what-so-ever”.  I don’t imagine you can beat that.  Can you?  Here’s the recipe. Hopefully, this will be you most joyous holiday Friday Food Find evah! I know it’s been mine.

Ingredients

1 bag of fresh cranberries, rinsed & gently patted dry (does not have to be perfectly dry)
1 small to medium size, seedless orange, cut into 6 pieces (however you want to do it) leaving the skin on
up to 1Tbsp of sugar (I use raw)

Process

Place cranberries and orange pieces into a food processor.  Begin processing until all ingredients come together to form a pureed relish type consistency (see picture).  Taste.  If the mixture is too bitter add suger a little at a time (processing in-between & scraping down sides of processor) until the sweet level is perfect for you.  This may take more that a tablespoon.  The sweeter the orange the less sugar you will need or at all. 

Use a spatula to remove cranberry sauce from processor.  Place into a container you can seal tightly.  It will last up to 1 week.

Yields up to 10 small servings. 

Friday Food Find: Goat & Cream Cheese Pate

I first saw this recipe in Gourmet Magazine years ago.  Always looking for fabulous party dishes for my catering company this one caught my eye immediately.  It’s visually inviting, tastes heavenly (especially if you like goat cheese) and it’s perfect to have or bring to a party.  I generally serve it with garlic toasts or multi-colored vegetable chips.  Really you can use anything that you find pleasing.  It’s gone through a lot of tweeks since I first made the recipe from the magazine.  And by trial an error I learned a few things which you will see below under “Tips”.  Have fun and enjoy!

Ingredients

4 - 8 ounce packages of cream cheese
1.5 C of goat cheese
¼ to ½ C of whipping cream
1-2 Tbls of fresh lemon juice
Salt and pepper
1-2 small containers of sun dried tomatoes in oil, drained and patted between paper towels
½ to 1 C of pesto
Fresh herbs or flowers to garnish

Process

Line the inside your favorite ceramic or pyrex dish with plastic wrap (7"x10” rectangle or a square works great). Make sure that the plastic wrap is very smooth on the insides & pressed smoothly up and around every edge. Leave enough plastic so that it hangs over each side and over the edge of your dish.  Set aside.

In a food processor process cream cheese, goat cheese until smooth.  Drizzle in whipping cream to open up the cheese mixture. Which will make it smoother and more airy.  Drizzle in up to ½ C although you may not need it. Add one TBLS of lemon juice at a time for flavor only.  You may not need the second one.  Stop machine at intervals to scrape down the sides with a spatula.  Mix in salt and pepper to taste.  Place cheese mixture in to a pastry bag with a large round tip.  

Place your plastic lined dish in front of you, very gently pipe in your cheese mixture with your pastry bag so that you have one even layer on the bottom of your dish. I generally begin piping from the outer edge of the bowl.  And then move inwards towards the center following the line of the dish you are using.  On top of your 1st cheese layer gently finger or spoon in the sun dried tomatoes so that they are spread evenly over the cheese layer. Then pipe another layer of cheese mixture over tomatoes.  Repeat this process with the pesto.  Then pipe one more layer of cheese over the pesto. This will be your last layer.  Smooth each cheese layer out with a small off-set spatula and cover tightly with the overlapping plastic.  Place in refrigerator overnight.

The next day take pate out of refrigerator and peel plastic from the top.  Place a serving platter (large enough to cover the pate dish) over the ceramic dish and gently invert.  Gently pull the ceramic dish from the pate and set aside.  Very carefully pull the plastic wrap from the pate.  Smooth pate with a spatula.  Garnish with herbs and flowers.  Serve with parmesan toasts.

Tips
*The smaller & deeper your dish the more layers you may have or excess ingredients.   
*Always drain the oil from the sun-dried tomatoes & pesto prior to using in this pate.  Excess oil will seep out of the final pate if there is too much.
*Use the added liquid (cream, lemon juice) sparingly.  You only want the cheese mixture to be “spreadable” not too soft.  If it is too soft add more cream cheese.  It will spread somewhat once unmolded if too soft. 

Cranberry Sauce = A No-Cook Holiday Add-On

CranberrySauce_copyright_2014_www.cookingbydesign_.com__thumb.JPG

A no-cook holiday cranberry sauce? Who knew!?!? Well it seems the very smart women in my family did. This recipe has been handed down by my mother-in-law.

It is a recipe to make a few days ahead. And takes about 5 minutes from start to finish. 

With just a few ingredients, it’s simple, fresh & bursting with flavor! And it’s not just for Thanksgiving. Enjoy.

Here’s your recipe.

Ingredients

1 bag of fresh cranberries, rinsed & gently patted dry
1 small to medium size, seedless orange, cut into 6 pieces, skin on
1Tbsp of sugar + more if necessary

Process

Place cranberries and orange pieces into a food processor. Begin processing until all ingredients come together to form a puree;relish type consistency.

Taste. If the mixture is too bitter add sugar a little at a time (processing in-between & scraping down sides of processor) until the sweet level is perfect for you. This may take more than a tablespoon. The sweeter the orange the less sugar you will need or at all.

Use a spatula to remove cranberry sauce from processor. Place into a container you can seal tightly. It will last up to 2 weeks in the refrigerator.

Yields up to 10 small servings.

Note: A piece of fresh peeled ginger or a pinch of spice can be added for a festive flavor.