Salads & Sandwiches

The Tim-Tastic Salad

What is The Tim-tastic Salad? Well, it’s the one salad I wait for all year; THE salad of our annual summer beach vaycay. It’s full of all good things; lettuce, cabbage, tomato, carrot, nuts, dried fruit and cheese.  And there is only one person who makes it just right - Tim.  

When I asked Tim what inspired him to make his salad he said he just loves the combination of ingredients.  Also, he can change things up if he wants to; nothing is set in stone.  Interestingly, Tim doesn’t work with measurements for this particular salad.  He considers measurement, though, by aligning all his ingredients on a cutting board.

img_0513_580.jpg

Who knew when we arrived at our beach destination yesterday that there were thoughts of making one of my favorite salads for supper.  A super refreshing, lite and healthful way to start a beach vacation with good friends.  

Dubbed especially by Tim’s daughter, Grace, THE Tim-tastic Salad is a definitive keeper.  Here’s to it!

Ingredients

3 cups your favorite lettuce, rough chop 
1 cup red cabbage, shredded or cut into 1/4” pieces
1 cup of baby tomato, sliced lengthwise
1–2 cup(s) carrot, sliced 1/4” pieces
1/2 cup any nut of your choice
1/2 cup craisins
1/2 – 1 cup of feta cheese, crumbled

Process

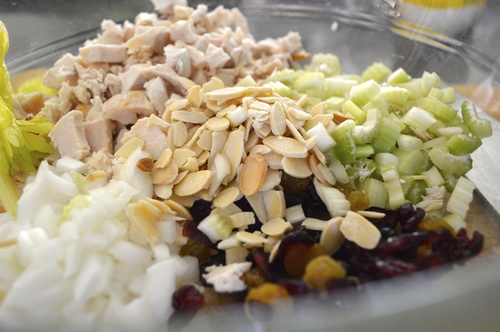
Place all ingredients on a cutting board.  In a large bowl begin layering 1/2 of each ingredient on top of the other in this order: 

lettuce / cabbage / tomato / carrot / nut / craisin / feta

Repeat layering until all ingredients are in the bowl.   

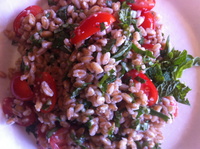
Serve immediately with your favorite dressing or vinaigrette.

Tim’s Tips

*In addition to the ingredients above you can add peppers, onion etc…
*If you get tired of Feta cheese you can replace it with Parmesan cheese.
*Layering ingredients is a gentle way of incorporating ingredients.  Also it prevents the smaller & heavier ingredients dropping to the bottom once mixed.

 p.s I took the liberty of adding some measurements to help you get started.  

Tuesday Tip: Storage for Edible Leaves

I’m learning a lot as I write for this blog, take courses on branding and have good friends staying with me for summer vaycay. How does this relate to understanding the best storage for a soft, easily disenigratable ingredient? Well, it’s about writing consistently and to the point. Understanding the difference between brand and branding and how to put it out there. And finally having a friend here pointing out the most simple of tasks. An action taken every time I return from the market.  One I’ve considered fodder but now according to my friend valuable.  Here’s the Tuesday Tip! 

After coming home from the market, take your pre-packaged salad leaves (or some may say lettuces) and transfer them to a large lidded container. Place the lid tightly on top and store in the refrigerator. This will enable you to de-compress and fluff the lettuce leaves allowing airflow which in turn will slower the speed of designation. Whether you purchase pre-packaged lettuce leaves or whole heads I recommend you use this tip to ensure a longer life for your edible leaves.

p.s. I’ve used a Rubbermaid cake keeper. This is a tool that I’ve had around always and never used for cake. But for my edible leaves it’s perfect!!!!

Pimento Cheese (Please): A Simple Sandwich

The first homemade pimento cheese I ever tasted was made by Mrs. Moore (the mother of my good friend Elizabeth).  At my house we always had some yummy pimento cheese in the fridge for cracker/celery snacks and sammies.  So it wasn’t unfamiliar to me but the concept of making it from scratch was-completely and totally.  Needless to say, I’ve been thinking about Mrs. Moore’s pimento cheese ever since; and it’s been just a few years (please let’s not go there).  Anywho, this simple and quick recipe is my ode to a fond memory and some rockin’ pimento cheese!!!

Ingredients

4C sharp cheddar shredded cheese
3Tbls minced pimento, drained
1Tbls fresh dill fronds, rough chop
2 ½ Tbls chive, minced
½ C mayonnaise 
1tsp-scant, cayenne powder
½ tsp kosher salt
¼ tsp fresh ground pepper

Process

Place cheese, pimento, dill and chive in a medium bowl.  Set aside.  In another bowl, mix thoroughly 1/2C mayonnaise, cayenne, salt and pepper.  Add mayonnaise mixture to bowl with other ingredients.  Mix all ingredients until incorporated.  Place in a tightly sealed container and store in refrigerator.  Refrigerate for up to one week.

Yields:  up to 5 cups

For the sandwich

2 pieces of your favorite bread
1tsp of mayonnaise
½ C of pimento cheese

Process

Place 2 pieces of bread next to each other on a cutting board.  Spread half of the mayo on one slice and the rest on the other slice.  On one slice of bread dole out all pimento cheese and spread edge to edge evenly.  Place second piece of bread on top of other piece with spread pimento cheese.  Align both pieces of bread.  Evenly slice off each side of crust.  Set crusts aside. Slice crust-less sandwich in half then each half into triangles.  Place on a long platter and serve immediately.  
*note: crusts can be eaten as a snack & “tasters” (they will have some pimento cheese on them)

Yields:  1 whole sandwich, 2 halves or 4 quarters

Tips
* pimento cheese can be served on crackers, celery and anything else you love
* take pc out at least 10minutes before spreading or serving so that the cheese can warm for easier action